
From journal entry May 30, 2020 – Day 78 of “Stay Home Stay Safe”
As I was sanding my new deck coffee table it accorded to me that designing, creating/building, and finishing this project was similar to the writing process I teach my First-Year Writing students. First, you to have an idea, a theme, or a subject you want to or need to write about. Second, you have to do some research, planning, and thinking about the project. Third, you have to write a rough draft, or as Anne Lamott say’s, a “shitty first draft.” Finally or fourth, you have to revise, reorganize, and polish the piece. In writing we use the the three terms High Order Concerns, Middle Order Concerns and Later Order concerns that help students understand it is a process.
My table project started while being confined to my home during the COVID 19 pandemic “Stay Home, Stay Safe”. I began thinking about making a coffee table for my deck to go with the wicker rocker I bought from the At Home store after receiving my pandemic stimulus check. I did a curbside pick up wearing my mask on April 30th. I had thought about buying a wicker coffee table to match it but decided I didn’t want to spend anymore money. The rest of the check went into the savings account. So, I surveyed the materials I had on hand. I had a piece of formica-topped shelving from a kitchen cabinet that I thought might make a good table top. I also had four ceramic tiles left over from the little dwarf house (that’s another story). I laid all the pieces out on the floor of my basement workshop for a visual of size and possibility. I even drew a sketch of how it might look (See image at right).
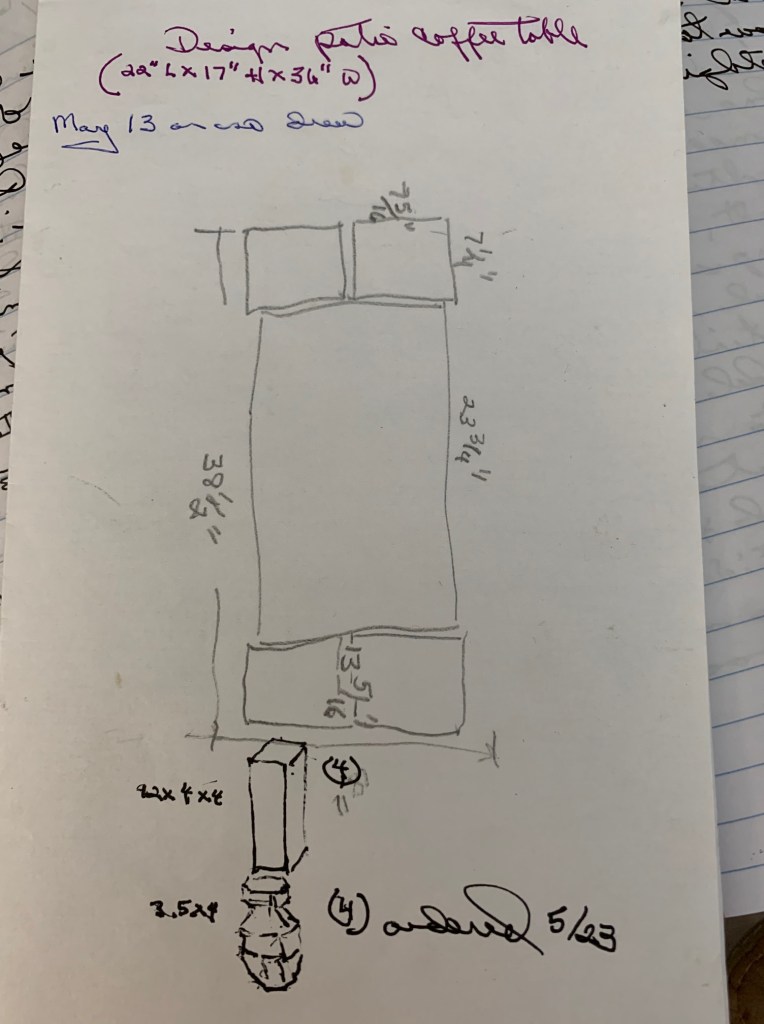
But after a week of thinking about this design, I decided it would end up being too heavy with the extra layer of wood to put all the pieces on. So I looked at other options. I had three pieces of deck wood from the side porch steps that had been removed when it was redesigned last summer. I laid them side by side on the floor of my workshop. they looked like they would be a good length. I went back to the website to see what the actual dimensions were for the wicker table I almost bought and realized the step boards would be a perfect length for the top. The wicker table was 38″ long by 18″ wide and 17-1/2″ high. So I drew a second sketch (see below) using the three step boards that were 36-1/4″ long for the top, along with the four 4″x4″x12″ legs, and the two 2″x6″x18″ boards to attach the legs to. At this point I realized the legs needed to be taller. I researched banister post tops. I found them on the Home Depot website. There were several styles to choose from and I really liked the octagon ones for only $5 each. I added the four 4″x3-1/2″ post tops to my sketch as feet for the legs. I liked how it looked, so I ordered them.

This part of the table project process is similar to the first phase of the writing process. A lot of thinking, planning, and researching has to happen before the actual writing can begin.
Once I had my final design, I took all the pieces I had and laid them out on the floor in my basement workshop. The post tops I ordered would not arrive for five days. Sometimes when writing you need more information so you do more research. And sometimes that research has to come from another library or you need to buy another book. Any project process takes time, waiting and patience are just as much a part of that process as the actual building or writing. From the time I first thought about making a coffee table for my deck until I actually had all the pieces to assemble on May 28th, almost a month had passed. As an instructor I try to give students this all important thinking, planning, researching time before their first draft is due.
Even writing about this project has taken several weeks as you see from my journal entry above, I began on May 30th. I wrote “Even as I sit here in my new wicker rocker writing about designing, building/creating, and finishing the coffee table, I’m considering what to write, why I’m writing, and how to explain each process.”
The next phase, phase II is making sure I have all the right size pieces, the lag bolts and the flathead wood screws needed to put it all together. I had only two 4″x4″x12″ pieces for the legs and I needed four. I needed to saw two more pieces from a longer piece. To do that I realized I needed to buy a new saw blade for my circular saw because the one I had was very dull. I bought the new blade when I picked up the four post tops on the 28th. That was an eye opening experience. Home Depot had a huge sign on the door saying everyone is required to wear a mask and practice social distancing, six feet apart. However, when I entered the tool section to get the saw blade there were at least six or seven men talking, standing right next to each other and not one had a mask on. I freaked! I quickly found what I needed, paid at the self checkout, and left the store. Fear of being exposed to the virus is very real, especially when you are 73!
Now, I was able to saw the other two leg pieces and the new blade cut through the 4×4 like it was butter. Once I had all four leg pieces I could to attach them to the two 18″ 2″x6s that the three step boards would be screwed onto to make the top. This phase is similar to taking notes, making a list of information you want to include, or writing an outline for that writing project.
Phase III is assembling all the pieces. I decided to attach the 4″x4s to the two 2x6s with two lag bolts for each leg. Lag bolts are screwed in with a socket wrench that has an attachment that fits the top of the lag bolt, depending on the size. I was using 1/4″x3″ lag bolts so I needed a 7/16″ socket. The socket wrench ratchets the lag bolt into the wood. The ratchet part is the lag bolt turning clockwise while the socket ratchets counterclockwise so that it is a continuous motion of screwing the lag bolt into the wood. This tool makes it easier to bolt things together no matter your hand strength. I have arthritis so this makes it doable for me (See socket wrench at the right).

I used two lag bolts for each leg and two legs attached to each 18″ 2×6. Once I had all four legs attached to the two 2x6s I was able to set the three step boards on top to see how it would look. I used four 2″ flathead wood screws at each end of the step boards to attach them to the leg pieces. I marked the boards with an x where each screw should go then drilled the holes and screwed the boards down. Once I had these pieces assembled I turned the table over so the legs were sticking in the air so I could attach the post-top feet to the bottom of each leg. The post tops came with a screw in the center so all I had to do was drill a hole in the center of the leg and screw them into each leg. I also used wood glue attaching the post-top feet to the legs. Once everything was assembled I took the photo you see below. I love building things with my hands, it’s therapeutic for me and after not seeing any family for over two months during “Stay Home, Stay Safe,” I needed this physical activity!

Phase III of my table project is similar to writing the first or rough draft of your paper. Pouring out all of that information onto the page or screen. Lamott calls it “the child’s draft.” My table was now together but there is still a lot of work to be done before it’s finished. And when writing this is also true. Now you move into the fourth or final phase where you revise, reorganize, edit and polish your writing just as I had to sand, make adjustments, and apply a finish to my table.
Phase IV of my table project starts with sanding, a lot of sanding. It took a couple of days. As I was sanding I was thinking about how I would finish the table. I had several options, staining and varnishing, or just sealing the wood or shou sugi ban. I had used the Japanese shou sugi ban technique on the arbor I built last year. I needed to think about it. It took me several days to sand the whole table (see below).

During phase IV sanding, I discovered one leg was not ratcheted tight enough to the 2×6. So I had to unscrew three screws and loosen the fourth of the outside top board so that I could get at the lag bolts underneath and tighten them down.
Every project has it ups and downs and starts and stops. After writing that rough draft you will almost always have to rearrange information, delete parts, and add new parts to make the piece readable that’s why this phase is called “Later Order Concerns.” I have now worked on this piece of writing for several days and many hours, reading out loud to myself, revising sentences, and adding my thoughts to make it more fun to read for you the reader.
Once I finished tightening the bolts and putting the top board screws back I decided I would finish the table using the Japanese wood burning technique of shou sugi ban to seal and finish the wood. I took the table to the back patio.
I watched a couple YouTube videos to refresh my memory on the technique. I used a small hand held blow torch that attaches to a canister of propane gas like that used on a camping stove. It’s actually quite easy, it just takes patience to evenly move the torch back and forth to burn the wood evenly. This took a couple hours. After I had the whole table burned it needed to be sanded again. I took the table back to the basement workshop and used the electric sander. I needed to wear a mask because the dust is actually soot. Yes! It is a very dirty, messy part of the process.

Once the table was all sanded again I brought it back to the deck and I sanded that table with a finer sandpaper, whipped it off with a soft rag, and then applied linseed oil. I rubbed linseed oil into the wood with a clean rag. I let it dry for several days. Then I rubbed the table with steel wool, whipped it with a clean rag, and brushed another coat of linseed oil all over it. This finishing technique is supposed to last 10 to 15 years.
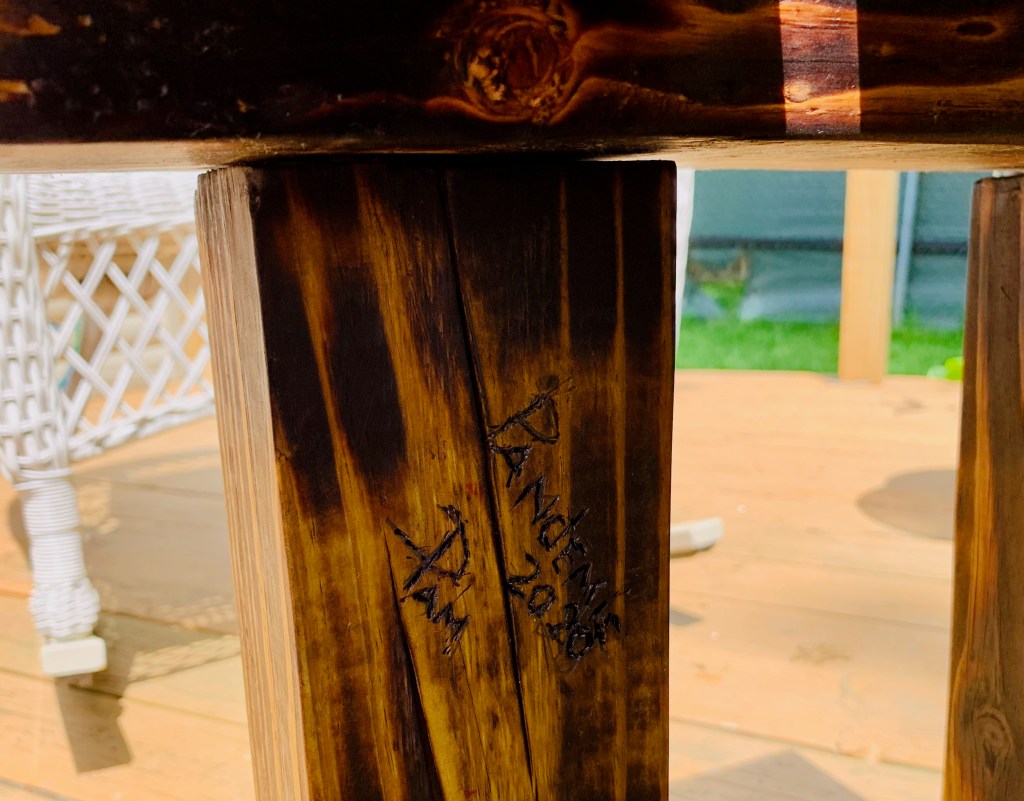
After thinking about, designing, building, and finishing the table I felt like I needed to sign it. I got out my wood burning tool and wrote “Pandemic 2020 Pam” on the inside of one of the legs. When I posted a picture of my table on Facebook, my sister-in-law replied I should call it the the “Pamdemic Table”. I laughed.

The finished table at right and above my signature.
Today is June 17th, day 95 of the 2020 pandemic. Michigan is in phase III of reopening. I’m doing fine. Designing, building, and finishing this table is proof. And now I have finished writing about the process for my blog.
Hope you enjoyed reading about my process!
